Tuesday, October 16, 2012

Decorating for the Holidays

I have to tell you, I’m a sucker for some holiday decorations. I come by it honestly because my mama decorates for every holiday…and I mean decorates. So, like I said, I come by it honestly.

I just love when October comes around. The leaves begin to change and the temperature gets cooler, but I love that my “everyday” decorations can be packed away for a little bit and my pumpkins can make an appearance. I love all the smells of fall and the colors too.

I decorated a couple of weeks ago, but have been making a few more things this year. So, let’s take a look.

blog stuff 2012 001

I told you the other day that my kids are getting more into Halloween this year, which means I am too.

Dallas and I went out shopping and picked up a few new items and some things to make some crafts. Now, I have to tell you that when I say I’m getting into the “Halloween” spirit, I mean glitter not gore. I am NOT one for scary things. I don’t like chains, ghosts, goblins, or bats.

I like pretty, glittery things.

witch shoes

Like these cute witch’s shoes.

I also love all the free printables that are out there for us to just grab, print, and frame.

Take this Halloween subway art:

Hal subway art

I printed it on cardstock, trimmed it a bit, and glued it to a blank canvas I had on hand. Easy peasy!

Want to see another super easy project? You’ll be embarrassed by how easy this is…at least I am a tad bit.

I bought some Halloween scrapbook paper at Wal-Mart for a measly $.97 for the pack. I used a couple of the strips that came with it to make the Halloween book covers.

blog stuff 2012 058

I had several 8 1/2 x 11 canvases left over from an old project. They’ve been collecting dust, so I figured it was time to put them to use…

Halloween canvas

So, I picked out 4 pages I liked, wrapped them around the canvases, and used my staple gun to attach them. So easy!!!

It all came together. I’m so pleased with all of the old and new decorations, and now I’m ready for Halloween and Fall.

Halloween collage 1

Halloween collage 2

blog stuff 2012 025

blog stuff 2012 026

So, what are some of your favorite Halloween or fall decorations?

Thanks for stopping by!

S~

Monday, October 15, 2012

What do you do when the boy asks for cookies?

First, you thaw some dough you have in the freezer.

Then, you catch the boy with sticky fingers or in this case, doughy fingers…

October 2012 043

{Do you see ‘em? There’s finger marks all in it…good thing the fingers were clean. Or were they?}

If the finger marks didn’t give him away,

October 2012 044

This face sure will…just look at that mouth – inside and out.

Third, after half the dough’s been eaten, roll the rest into balls and add some Halloween sprinkles.

October 2012 049

Bake at 375 degrees for about 9 minutes. Let cool for a few minutes, and serve warm.

October 2012 052

Easy peasy…the boy asks for cookies, he gets cookies.

October 2012 048

Friday, October 12, 2012

Halloween Book Covers

Hey y’all! Happy Friday. How in the world is it Friday already? I was just telling a friend that my list of blog entries is so long, but I never seem to have enough hours in the day to get my to-do list done and still have time to post. But, what’s a girl to do, I’m a busy mama with lots on my list.
I’m so excited to share a little something I came up with last weekend. Last Sunday I finally got around to putting out my Halloween/Fall decorations.
I have to say I’m usually more of a “fall” decorations kind of girl with pumpkins and such. However, my kids this year are really getting into the Halloween thing, so I bought a few more Halloween-y decorations.
I was super excited when I found this scrapbook paper set at Wal-Mart for $.97.
blog stuff 2012 003
Isn’t it just darlin’?
I’ll share with you later what I did with the big paper later, but let’s take a look at the strips of paper, shall we.
blog stuff 2012 005
I wasn’t quite sure what I was going to do with them until I looked at my entry hall table.
blog stuff 2012 011
This is where I started. Do you see the two books on top of the table. Well, as I started taking everything off, I knew I wanted to use the books still, somehow. But, they didn’t work with the Halloween theme. Then it hit me, book cover.
I went old school people…back to the days of brown paper bags made into book covers…although I got a little fancier.
I took the book cover off one of the books and brought out the gobs of burlap I have left over from my front door curtains.
blog stuff 2012 017
I laid the cover on the burlap and cut two pieces to size.
Then I folded over the top and bottom about 3 inches or so and ironed them down real good. This way I could slip the cover on the book.
blog stuff 2012 018
And that is just what I did, open the book up and slip the burlap on the top and bottom covers of the book.
blog stuff 2012 019
They were a little plain and needed a little touch, so I took those strips of Halloween scrapbook paper, and picked out two that I liked.
I wrapped it around the book and with a dab of hot glue, held it into place.
blog stuff 2012 020
Now it wasn’t long enough to go around the entire back of the book,
blog stuff 2012 021
but that’s ok, because the back of the book is on the table and no one will ever know. Winking smile Our secret.
blog stuff 2012 023blog stuff 2012 024
And there you have it simple, and cute, Halloween inspired book covers. Now isn’t that just the simplest form of decoration?
blog stuff 2012 058
After they were finished, which literally took about 30 minutes, I put my entry table together.
blog stuff 2012 051
blog stuff 2012 052
And, we’re starting to get the Halloween/fall feeling around here.
What about you???

Monday, October 8, 2012

Halloween {Boo} Wreath

I figured that since it was October and Halloween was around the corner, I needed to take down my 4th of July wreath and replace it with a new and festive one.
I really like making the ribbon wreaths. I think there’s so much you can do with it.
So, off to Michael’s I went and bought ribbon, a wreath form, and letters for the word “BOO”.
For ribbon I bought plain black and orange with small white polka dots.
I used some floral pins I had on hand from making previous ribbon wreaths. I find that using the pins for this project is much easier than hot glue…seeing that hot glue sometimes tends to melt the styrofoam wreath form.
blog stuff 2012 004blog stuff 2012 005
And, if you place them on the back of the wreath, no one will see where you start and stop.
I alternated between the two colors wrapping them tightly around the form.
blog stuff 2012 001
The letters were white with glitter already one them…ba-ling!   {even though you can’t tell in the picture.}
blog stuff 2012 006
I knew they would show up better on the black ribbon and decided I wanted them to be placed vertical so the black ribbon would be on the sides.
But, my wreath still needed a little something. I wasn’t in the mood to make felt flower wreaths, and quite frankly didn’t think they would go very well with this wreath, so that idea was out. Lima bean? Nope, been there..loved it, but they kept melting off my old wreath.
After a few minutes of pondering I decided to make poofs…that’s right, poofs.
I had some left over lining fabric from my burlap curtains and cut 4 strips. They were 23” X 6” {Ok, so that’s really a guess…I measured when I actually did this but it was last week and I can’t remember the exact measurements, but it’s somewhere in the ballpark.}
Here’s a picture of two of the 4 strips cut.
blog stuff 2012 008 
After the strips were cut, I sewed a straight stitch down the center of the fabric. I made sure that the stitch was longer, so I set the length on my sewing machine to a 4.
blog stuff 2012 010
When all 4 had the stitch down the center, I pulled out the bottom stitch on all of them to make a ruffle. I left the edges of the material raw, mainly because I liked the look.
Then, I just bunched them together and hot glued 2 at the top of the “Boo” and two on the bottom right corner.
blog stuff 2012 012
And there you have it… a Halloween {BOO} Wreath.
blog stuff 2012 016
Well, Happy Monday. I’ve been a busy bee creating new Halloween decorations for the house. I can’t wait to share with y’all this week.
Do you have any favorite Halloween decorations?

Saturday, October 6, 2012

12 Years Ago…

12 years ago tonight a northern boy and a southern girl had their first date, and their lives would never be the same.

Who knew that a bouncy, southern twang talkin’ college student could impress and be asked out by a yankee boy who was 6 years older than her…

I guess it was the sweet sound of the southern twang in her voice, or maybe it was her smile and bubbly attitude {as he likes to tell the story}. But there was somethin’ about those crystal, baby blue eyes that drew this southern girl in hook line and sinker.

It was a match made in heaven. And although he had to work a little bit she caved and these two lived {and still are living} happily ever after…

I seriously cannot believe it’s been 12 years since Eric and I had our first date. It seems like just yesterday he was picking me up after work to hit downtown Athens, GA for dinner and clubbing.

I remember the butterflies and excitement. I remember what I wore {and yes, I know it’s cra-zy that I remember this}. I remember standing outside DePalma’s Restaurant having a drink waiting 45 minutes for a table, and I was STAR-VING!

I remember our table in the corner of the restaurant and how we ate and talked like no one else was in the room. Then we met up with a few friends and hit the clubs for some dancing.

What a great night!

But, I must share my favorite memory of that night. You see, growing up, my Daddy always taught me that when you go on a date a guy likes to have a girl who will eat. It’s not polite to order a big meal, take a couple of bites, and then say, “I’m full”. This was engrained in me for years. Well, this night I was going to make my daddy real proud.

After waiting 45 minutes for a table and not eating much that day because I had school, work, and quite frankly I was poor, by the time we sat down for dinner I was star-ving…and that’s putting it mildly.

Well, I ordered my favorite thing on the menu…a pasta dish. Eric ordered chicken fettuccine alfredo {or something of the sorts}. We talked, and laughed, and ate. Eric pushed his plate to the side with about half of his dinner left. The waitress came by and asked if he needed a to-go box. He simply replied, “No, I don’t thank you, but maybe she…..nope, she doesn’t need one either.”

At that point I looked up to him and the waitress, and looked down at my bowl. I was scraping every last morsel out of my bowl. Nothing was left, and to tell you the truth I might’ve licked the bowl clean if I could’ve.

He kind of giggled, looked at the waitress and then at me and says, “Would you like some of mine?” and started to hand his plate to me.

I was mortified!!!! But I was full, and my mission was accomplished. I ate my dinner and I was quite satisfied.

I guess we all have those fun first date stories and memories. It’s fun to look back and think how times have changed. To think we were just two mere crazy kids entering the dating scene not knowing that God had put us together for a reason.
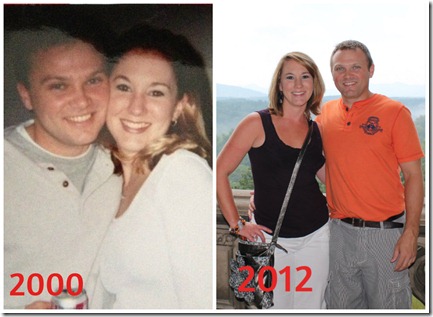
me and eric collage

The story that was will still go on…I am still the southern girl and he will always be my northern boy. So, to celebrate tonight I made a dessert I want to share with you. Just think of it as a sweet southern twang meets northern deliciousness.

Banana Pudding Cheesecake

1 1/2 cups finely crushed vanilla wafers

1/4 cup chopped walnuts, toasted

1/4 cup butter, melted

2 large ripe bananas, diced

1 Tbsp. lemon juice

2 Tbsp. brown sugar

3 (8 oz.) packages cream cheese, softened

1 cup sugar

3 large eggs

1 Tbsp. coffee liqueur

2 tsp. vanilla extract

Meringue

Preheat oven to 350 degrees. Combine first 3 ingredients in a small bowl. Press into bottom of a greased 9 inch spring form pan. Bake for 10 minutes. Let cool on a wire rack.

Combine bananas and lemon juice in a small saucepan. Stir in brown sugar. Place over medium-high heat and cook, stirring constantly, about 1 minute or just until sugar melts. Set aside.

Beat cream cheese at medium speed with an electric mixer 3 minutes or until smooth. Gradually add sugar, beating until blended. Add eggs, 1 at a time, beating until blended after each one. Beat in liqueur and vanilla. Pour into prepared pan. Spoon tablespoonful's of banana mixture evenly over mixture and swirl gently into batter.

Bake at 350 degrees for 35-40 minutes or until center is almost set. Remove from oven, and increase oven temperature to 400 degrees.

Drop spoonful's of meringue gently and evenly over hot cheesecake. Bake at 400 degrees for 10 minutes or until meringue is golden brown. Remove from oven and gently run a knife around edge of cheesecake to loosen. Cool cheesecake completely in pan on wire rack. Cover loosely and chill 8 hours. Store in the refrigerator.

Meringue:

3 egg whites

1/4 tsp. salt

6 Tbsp. sugar

Beat egg whites and salt at high speed with an electric mixer until foamy. Add sugar, 1 Tbsp. at a time, beating until soft peaks form and sugar dissolves (about 1-2 minutes).


So tell me, do you have any fun first date stories? I’d love to hear them.

Thursday, October 4, 2012

Fish in Roasted Red Pepper Sauce

You won’t believe how easy this fish is to make, and it’s simply delicious.

1 lb. white fish fillets {I used tilapia, but you could use cod}

2 Tbsp. olive oil

1/4 cup flour {I used whole wheat flour}

1/4 cup Fat Free Zesty Italian Dressing

1/2 cup sliced onion

4 oz. 1/3 less fat cream cheese

1/4 cup roasted red peppers chopped

1/4 cup chicken broth

1 Tbsp. minced garlic

blog stuff 2012 037

Coat both sides of the fish with the flour and set aside. Heat olive oil and dressing in a large skillet to medium-high heat. Add onions and cook until crisp tender.

blog stuff 2012 039

Move onions to the side of the pan and add fish. Cook 5-7 minutes on each side until fish is flaky.

blog stuff 2012 042

Meanwhile, in a small saucepan, melt cream cheese with chicken broth. Add red pepper, garlic and heat through.

blog stuff 2012 041

When fish is flaky, serve on plate with sauce on top.

blog stuff 2012 043

Can you believe how easy that is??? and it’s SO yummy.

Monday, October 1, 2012

Front Door Curtains

Hey, y’all. Happy Monday to ya. I don’t know about where you are, but it’s a pretty cool, and very wet Monday here. I’m loving it. Makes me want to stay locked up in the house and sew…or watch a movie.

I’m so excited to share with y’all today my front door curtains. I mentioned on Saturday’s post that I actually finished them. I’ve been wanting to make curtains for my front door since I saw them at the Southern Living Idea House back in August. I mean who knew that adding something so simple as curtains would really dress up a door. Crazy!

Here’s what my front door looked like prior to Saturday night:

blog stuff 2012 021

As my Hunter would say…”BOR-ING”.

After seeing the curtains at the Idea House, I knew I had to make some…

Foyer

I mean, how gawgeous is that? I love how they just add a bit more character to the door.

They used burlap here, and I love the rustic yet chic look they give.

So, I knew I wanted to make curtains, and I wanted mine to be burlap as well. Now, you don’t have to make yours burlap, you can use any kind of material out there…just find one that suits you. I’m sure there are tons of ideas out there on Pinterest.

I bought the burlap and lining and was determined to make these curtains…only problem – I’ve never sewn curtains before. I’ve made curtains, yes. If you remember I made some No-sew curtains for my dining room. I wasn’t sure the tape would adhere to the burlap very well, and now I can kinda-sorta sew, so I was going to figure out how to sew these curtains.

Well, where’s the first place we go these days to find ideas for anything? Google? Google who? We all turn to our trusty friend and side-kick, Pinterest. Looking around I found the best blog that had a tutorial on how to make professionally lined curtains. You can find the tutorial HERE.

Allison does a fantastic job {in my opinion} of walking you through step by step on how to make these curtains. The best part of all, there are visual aids and pictures to go along with each step. This is wonderful for the visual learner that I am.

I would walk you through how I made mine, but why re-invent the wheel? Plus, I couldn’t do half as good of a job writing this tutorial as Allison.

Anyway, back to the story at hand. I was determined to make some burlap curtains for my Plain Jane front door. Well, some rain showers set in on Saturday and pretty much washed the day away and all of our plans for that day with it. But, I was not bummed in the least. I was able to focus and make my curtains.

I tell you, they were not hard, but they were a bit time consuming. There’s A LOT of ironing that goes into making curtains. Along with pinning, sewing, un-pinning, measuring, measuring, and more measuring.

So, it took about 3-4 hours from start to finish {if I hadn’t had interruptions}. When they were finished Dallas and I headed to Target to get a curtain rod, because these suckers were being hung.

I hung the rod {with a little help from my hubby} and hung the curtains to check on the length.

blog stuff 2012 022 

Doesn’t it look better already?

I finished the bottoms to with the length and then tied them back with ribbon. Now, in the Idea House, they used rope. Well, I didn’t have rope, and I wanted to make a statement that was me and not just copy everything. I’m a ribbon girl, especially a grosgrain ribbon girl. I pulled out some brown ribbon with white polka dots I had on hand and used that to tie them back.

I stood back and pretty much jumped up and down. I just love them.

blog stuff 2012 024

They really add something special to my front door.

Front door collage

So, what do you think???